We used to have those around here too, but not in 20+ years. I suspected not enough people worked on their own cars anymore to make such a place pay for itself.
Harv wrote:
We used to have those around here too, but not in 20+ years. I suspected not enough people worked on their own cars anymore to make such a place pay for itself.
the trouble Harv is there is nothing on today's cars to fix , disposable like every other thing now days.
Well, the news is good. It's an exhaust manifold and not the HG. So I've got a spare HG set to make sure the gaskets stay sound forever :)
Next step - source a passenger side exhaust manifold...
It must have split completely to make as much noise as it was. Have they taken it off and definitely confirmed it?
Morat wrote:
Well, the news is good. It's an exhaust manifold and not the HG. So I've got a spare HG set to make sure the gaskets stay sound forever :)
Next step - source a passenger side exhaust manifold...
Is there not one in the HG set you could use?
I would think it is the actual manifold that has split at the flexi section and not just the gasket.
Gilbertd wrote:
I would think it is the actual manifold that has split at the flexi section and not just the gasket.
Yep, it's the manifold rather than the gasket. I'm seeing lots of them on the bay of E. I'm wondering how good a bet they are second hand.
Ah I see, missed that, though it seems like good news all the same (well at least better news than the HG would be)
Made a beginner's mistake parking in the garage and nicked the front bumper ... darn, did not need that ... it broke like glass, now I need also to add that to the long list of things to do ... never a moment of rest :-(
Got the replacement manifold skimmed yesterday as the flange surface was rough as dogs.
Had a great wedding anniversary today .my vogue decided the water pump should fall Luckily nothing broken up or cooked Just bearings gone .
Then the TDI to v8 discovery 1 decided it play up with a missfire ----- turns out lead not on plug properly So after that little lot got video done to prove failure for warranty
Following the saga of the dying starter motor (separate thread) a new starter was fitted. For a large vehicle with what should be plenty of room it’s a bit of a pig to do. Coupled with the ‘meaty’ Hankook battery it surprised me just how quick it spun the V8. Next job is to refurbish the old starter motor.
As removing the wheel arch liner would facilitate the removal/replacement of the starter motor I took the opportunity to replace the rather sad looking OSF mud flap. As expected, the mud flap fixings were completely corroded so all were cut/ground off to remove the old mud flap, the new one being replaced with uprated fasteners all round cos bigger is always better!
Whilst under the wheel arch the brakes discs and pads were thoroughly checked - all OK and I also took the opportunity to remove the caliper sliding pins and clean/re-grease them.
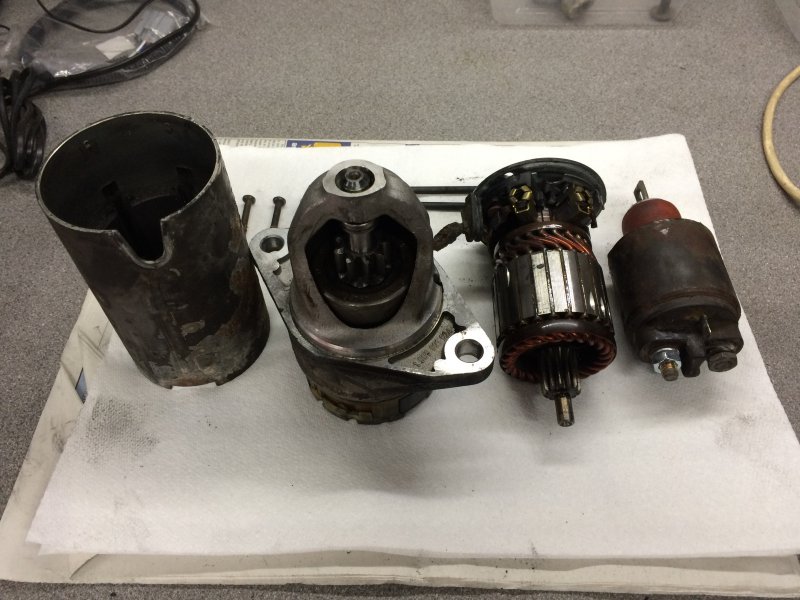
Today I completed the refurbishment of the errant starter motor. A few piccies:
First stage of disassembly - note the orange shroud around the solenoid piston. Not seen one of these before but I assume it’s there to keep the solenoid inner workings as clean as possible:
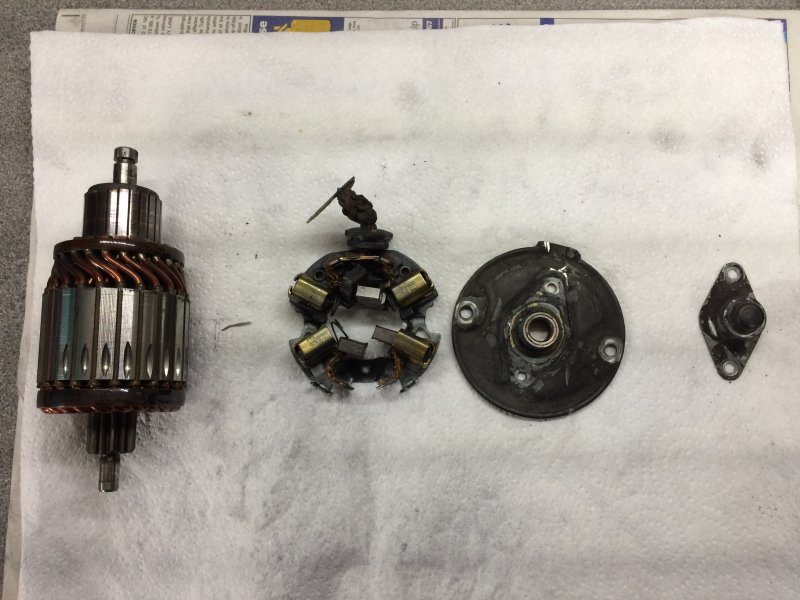
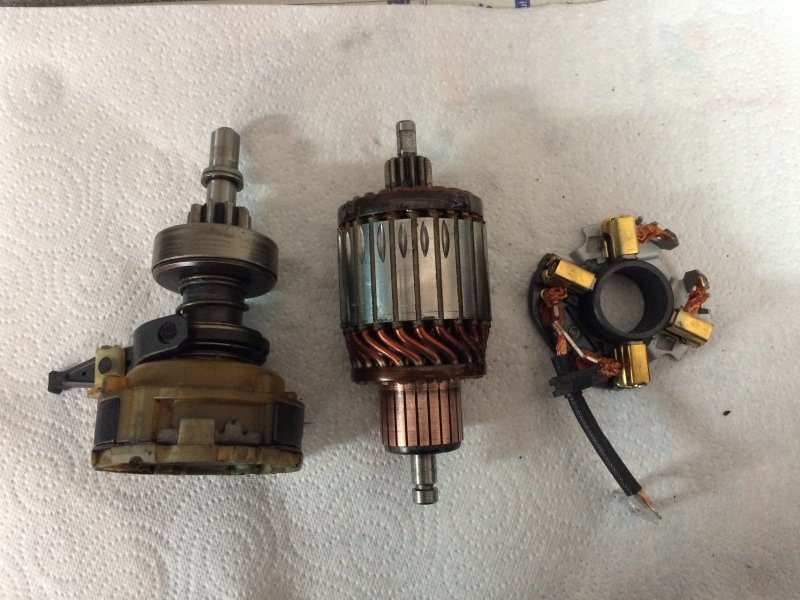
Second stage of disassembly - the main motor components:
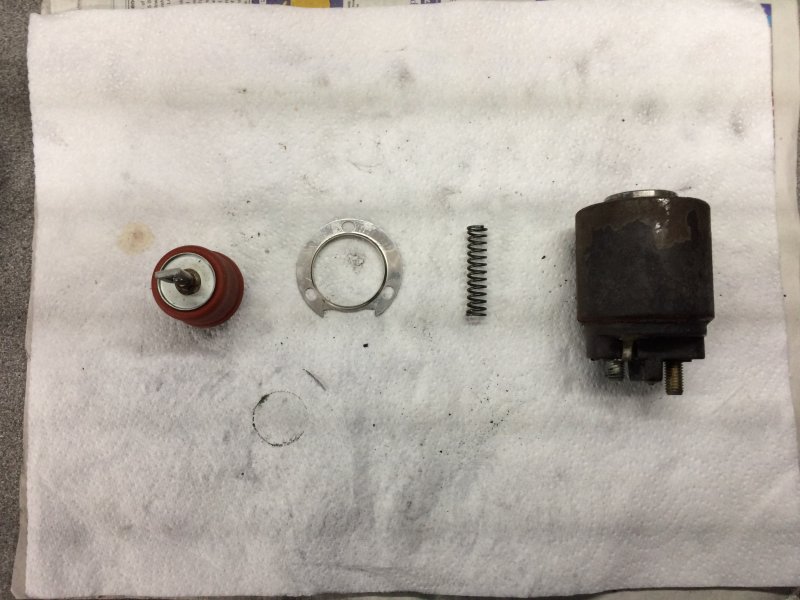
Third sage of disassembly - the solenoid. I feared this may be the problem child but couldn’t find any clear problem. The piston seemed pretty clean and moved freely. All the contacts conned out OK but were thoroughly cleaned as were its inner workings:
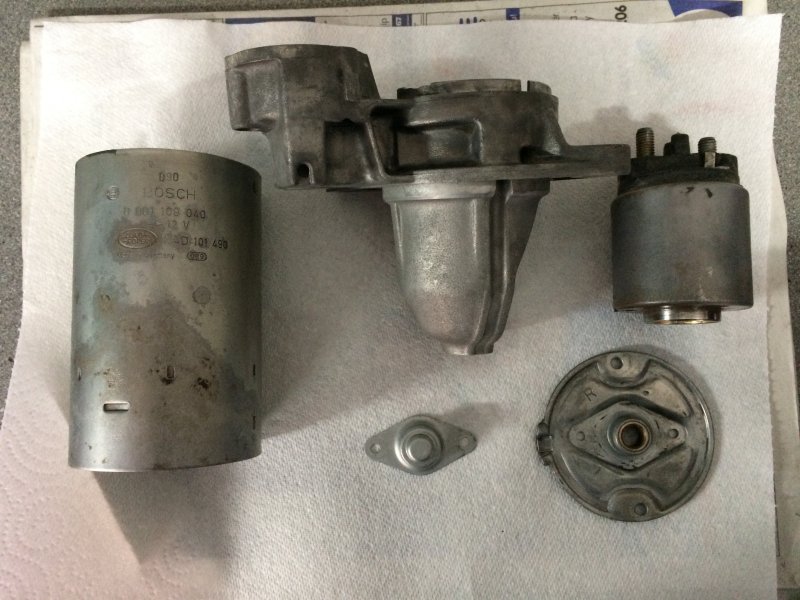
Items after a run in the wash tank and the blast cabinet to remove paint and generally clean them up ready for painting:
Main motor bits cleaned up, commutator and bush/bearing surfaces polished. All gears were cleaned out and re-greased. The new brush cage assembly is also in shot:
Parts masked up and then painted in primer ready for top coat:
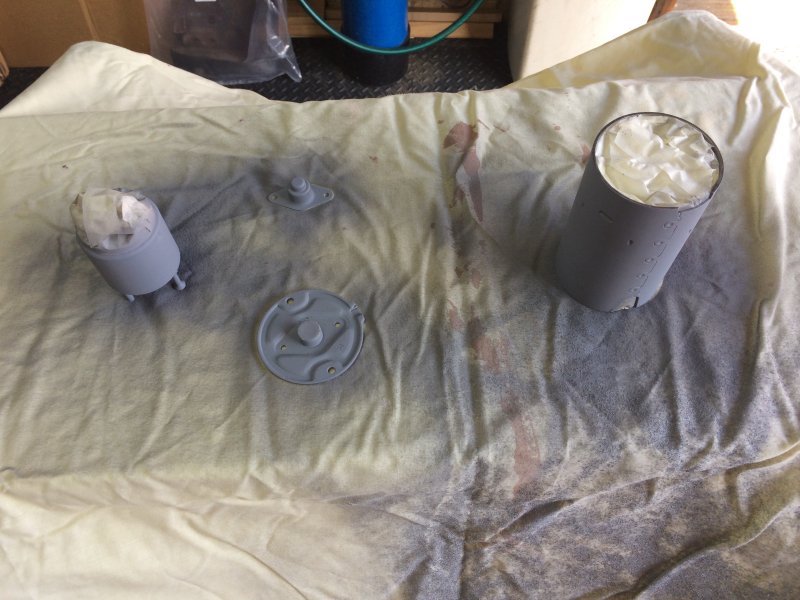
Once the top coat had dried all items were then inspected, thoroughly cleaned (again) ready for reassembly. I did not find any real problem, even the carbon brushes and cage assembly looked to have plenty of life left - it was renewed anyway. The whole unit was then reassembled. The biggest problem experienced during this exercise was disassembly and getting the fixings out. The main through bolts were OK but the three bolts holding the solenoid in place and the two small screws locating the brush cage in place were a right pain. The heads seemed to be made of chocolate and chewed up rather quickly and easily rather than just unscrew. Perseverance beat them into submission and new Allen head stainless steel bolts replaced them.
The acid test was a few test runs on the bench. Here’s a video of one:
It’s now packaged up and on the shelf joining my other ready use spares!
nigelbb wrote:
Yesterday I drove my 2001 Vogue up to Lincolnshire so that V8 Developments can totally recondition the engine. It's been blowing from a leaky head gasket for a month or two & getting louder& louder. At least it made the 150 mile journey OK. The plan is to get it done over the next few months when they have a chance to work on it. Aside from reconditioning the engine they will be putting on a new Airtex water pump & a good quality OEM fan viscous coupling plus new HT leads for starters.
They showed me some engines that were ready to be shipped out. It's surprising to see the shiny aluminium rather than covered in oil.
Here is a list of what is going to be done:-
4.6L Top hat linered block
New pistons
New piston rings
New main bearings
New big End bearings
New cam bearings
New core plugs
Fully balanced assembly
Pocketing of pistons
Lapped and polished crank
High torque cam kit
Camshaft
Timing chain set
High rev Lifters
Running in oil and additive
Comp head gaskets
Comp head bolts
Fully reconditioned cylinder heads
Acid dipped and chemically cleaned
New valves
New guides
New valve stem seals
New valve springs
All required gaskets and seals
Labour
Fully refurbished rocker assemblies
Adjustable pushrods
Fit exchange front cover, including new oil pump gear and uprated oil pressure relief valve kit, fit exchange sump
Fully refurbished rocker covers
Uprated flex plate for flywheel
Removal and refit of engine including, plugs, filters, fluids etc
I didn't do it today but a couple of weeks ago but after a wait of over eight months I finally collected the car from V8 Developments. Richard aka @Gilbertd was kind enough to drive me up there after picking me up from Peterborough railway station.
The 150 mile drive home was uneventful but next day I found all sorts of weirdness going on. The key fobs wouldn't lock or unlock the car & the rear wiper wouldn't work or park but just hung down at 90 degrees in the rear window. I charged up the battery & all the problems went away. The rear wiper parked itself & both key fobs operate correctly although I had to do the re-synchronisation by pressing buttons while turning the key in the lock for the spare key. The battery is a relatively new Hankook MF31-1000 & I can only assume that as it had been sitting around unused for eight months that the battery had got nearly flat & driving home with the lights on hadn't charged it up enough. I'm still a little suspicious that the battery has deteriorated with disuse as it's now very sluggish turning the engine over. It starts just as easily as it has always done but previously it turned over much more vigorously at higher revs now every time I start it seems that the battery is almost dead. I bought a new fancier battery charger & the voltage when charging is 14.7V but it seems that the amps it can chuck out have reduced. I'm tempted to just buy another battery. Compared to the final bill of £7K for the new engine £130 for a new battery is peanuts,
Yesterday we drove down to our cottage in Brittany. Normally we travel Portsmouth->Saint-Malo as it minimise driving but my wife had won a return crossing with P&O plus £150 in vouchers to spend in the duty free (mostly spent on fancy bottles of spirits for family Xmas presents). It's about 30 years since I used the Dover->Calais ferry but it's still as slick with loading/unloading as it has ever been. The ship wasn't very full & queuing up for passport control in Dover took all of a couple of minutes. There didn't appear to be any French customs in Dover or Calais. The drive was 600km versus the 115km from Saint-Malo but was uneventful. The engine is more powerful & accelerates smoothly plus fuel consumption is improved a little at over 18mpg cruising at 110-130kph (70-80mph). Part of the reason for the power increase maybe because it turned out that my engine oddly had the old 14 bolt heads from a RR Classic fitted & these were replaced with the correct 10 bolt higher compression heads fitted to a Thor. I've owned the car for twelve years & it had 80K miles on the clock when I bought it but why the old style heads should have been fitted is a mystery. It was mentioned that the engine had been replaced at 50K miles by Land Rover but I had no evidence of this.
We live in Brittany half of the time so the car is French registered. It's booked in for its contrôle technique this afternoon. The CT is like an MOT but only needs to be done every two years at a CT station which are independent operations that are forbidden to do repairs so are very fair as they have no incentive to fail on minor faults so that they can charge to fix them. If there are minors failures you have two months to get them fixed & then have a return visit to a CT station where they will just test the previously discovered faults. I will report back on the outcome.
Battery may well have suffered if it has been sitting around flat but don't forget you now have a lot more compression that you had before so it will turn over slower.
nigelbb wrote:
We live in Brittany half of the time so the car is French registered. It's booked in for its contrôle technique this afternoon. The CT is like an MOT but only needs to be done every two years at a CT station which are independent operations that are forbidden to do repairs so are very fair as they have no incentive to fail on minor faults so that they can charge to fix them. If there are minors failures you have two months to get them fixed & then have a return visit to a CT station where they will just test the previously discovered faults. I will report back on the outcome.
It failed on a few items. I have two months to fix them. If it fails the re-test I will get another two months to fix them. I think that you can just go on failing & re-testing but obviously that isn't ideal.
Apparently there is a lot of power steering fluid that has leaked. I need to take a look at this tomorrow. The power steering is working perfectly but perhaps not for much longer if it's losing fluid. I will top up the reservoir & then see if there are any leaks evident. I don't recall ever topping up the reservoir so it's not a case of me overfilling it or spilling fluid.
The second fail was on the headlamp orientation. I've still got RHD headlamps which have got some stick on deflectors that enabled it to pass last time but they have probably been moved by the headlamp wipers. I just need to set up the car in front of a wall in the dark & stick on some new ones.
The third fail was on holes in the exhaust system. TBH it is sounding pretty throaty. I had a new exhaust fitted about 6-7 years ago & opted for a heavier duty one that would last but am now regretting not getting a stainless system. The catalysers were OK which was a relief.
Finally it marginally failed on CO emissions. This might be related to the exhaust system but there was just a bit of E10 left in the fuel tank. When I am in France I have been running it on E85 (up to 85% bioethanol) because it's half the price of regular petrol. I hadn't yet tried the new engine with E85 but just after I came out of the CT station the low fuel warning light came on so I went & filled up with E85 from the nearby garage. E85 has lower CO emissions according to Wikipedia. Since I filled up it's running on nearly 100% E85 & performance is as good as ever. I have previously noticed a reluctance with cold starts when running on E85 & having to crank it for longer than when running on E10 but hopefully it's still going to start even if the cranking over is a bit sluggish with the higher compression heads.
All in all I don't feel too bad about the fail as I did zero preparation & didn't even look under the bonnet. None of the fixes is a big deal. I shall have to price up exhaust systems. Perhaps it is time for a stainless system now?
Gilbertd wrote:
Battery may well have suffered if it has been sitting around flat but don't forget you now have a lot more compression that you had before so it will turn over slower.
I need to do a test by swapping for a known good battery & see if there is a difference or maybe just pay £130 for a new one
I put one of these https://www.gravityperformance.co.uk/product/exhaust/cat-back-exhaust-system-range-rover-p38-mk2-v8-td-94-02/ on mine but with a standard mild steel centre box. Not that much more expensive than a mild steel aftermarket and after going through one every couple of years, figured it should be fit and forget. They also do at mid box delete pipe https://www.gravityperformance.co.uk/product/exhaust/centre-sections-resonator-deletes/exhaust-centre-section-range-rover-mk2-p38-4-0-4-6-v8-94-02/ but not sure if that would make it too noisy and drone on a long run like you do. I know it would drive me bonkers.....
I recently had the chance to hear a lot of P38s in different configurations ( I actually need to update you guys on recent developments), and I can tell the 'straight pipe' with the original backboxes and the cats, there is no droning, but a hearty and robust sound.
straight pipes and sport backboxes (those small that look like cherry pipes) and is LOUD, and very pleasant but ... loud!
another dude has straight pipe and no cats and no backboxes (just straigh out) and it is LOOOOUD you cannot survive it.
lastly, no cats straight pipe and backboxes is pleasantly rumblish resembling an American muscle car, but it does drone and is very bothering if your ears do not like that frequency.
I forgot to mention that annoyingly on the way to the CT station the sound system packed up with just an annoying clicking in the rear speakers. It's a 2001 Vogue with the fancy HiFi so it seems likely that it's the DSP amp in the boot that has packed up. As I recall these cannot be repaired & fitting one from a breaker could just see the same problem recur. I'd just been thinking on the drive down what a nice sounding system it is but perhaps this is my opportunity to upgrade to a modern head unit?