rangerovers.pub
The only place for a coil spring is up Zebedee's arse
Member
Joined:
Posts: 383

So a couple of weeks ago we fitted springs to P38 #2, the 1996 one I was given for free for parts. The truck was a runner and has been my brother’s daily driver for the last two years. Not bad for a freebie for parts.

It lives 300 miles from me on the far south coast of NSW and the maintenance work falls to me. As you can appreciate, hardly handy.

We have sorted the air suspension out a number of times, and it was functional, but the gaps between functioning and issues was getting shorter and shorter. Finally, after it decided to sit on its bump stops, and no amount of coaxing would get it sorted, we decided to put it on springs.

Interestingly, Nano was no help at all, and the only fault it listed was ….. unspecified fault. Thanks Nano, I know it has a fault, be nice if you told me what!

Terrafirma package fitted, easy job, truck looks good, rides well. Brother is happy. Next job will be to replace the bump stops which have been pounded to dust from all of the miles on them!

Member
avatar
Joined:
Posts: 7822

Marshall8hp wrote:

Well done! Was this a twin to start with? These seem to have fitted up nicely.

Yes, it's always had twin pipes but after replacing the original Land Rover ones with aftermarket at least twice now, I figured the extra on stainless was going to be worth it.

Member
Joined:
Posts: 213

Simple job - replace the rusted out rear mudflaps. However, I replaced the puny OEM screws with bigger No14 (6.3mm) size stainless steel screws, SS penny washers (which needed to be ground to fit the recesses in the mudflaps) and No14 plated captive nuts plus plenty of anti-seize (just in case I need to remove them in future). The holes in the the mudflaps also had to be drilled out to 6.5mm to accommodate the new beefier screws.

Whilst replacing the offside mudflap it became apparent that the exhaust mounting rubber to the front of the rear exhaust tail pipe box had broken. Luckily I had a couple of spares so that was quickly replaced.

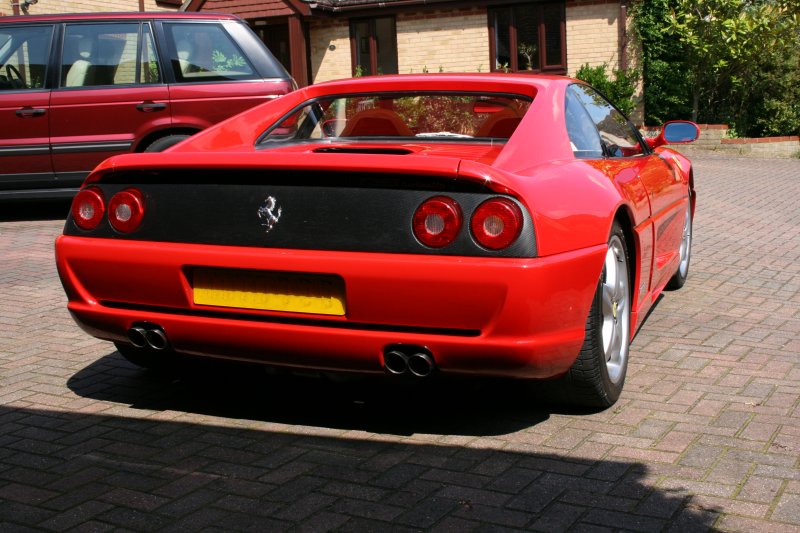
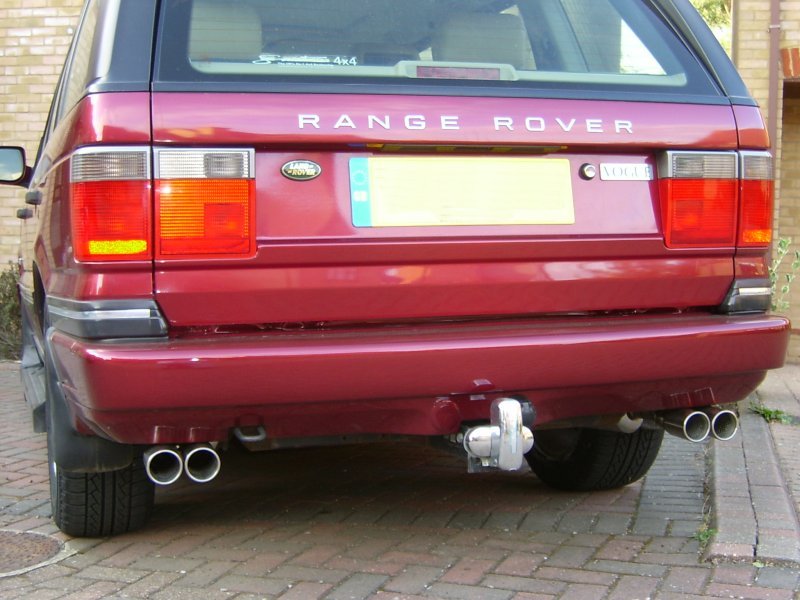
Talking of exhausts Rangie is very offended by the suggestion that quad pipes are "ridiculous" - Rangie feels and looks just that little bit more sporty in her old age:

enter image description here

OK so it's not like a Ferrari, the rear bumper is shaped to accommodate the quad pipes like this:

enter image description here

Member
avatar
Joined:
Posts: 7822

I must admit that's the first time I've seen quad pipes where you haven't had to hack lumps out of the bottom of the bumper.

Member
Joined:
Posts: 654

Good price on your exhausts Richard.

I forked out £600 odd for a Double S stainless system with centre box some time ago and expect to hit break even late next year going by the 3 years or so a Klarius system from my local tyre and exhaust place lasted before the back boxes started blowing glass fibre out. My Double S has turned down ends to the pipes too. Thought it a bit stingy when the box just had the exhaust in it with no clamps or support rubbers. Naturally the tyre shop didn't have the big clamp for the centre so I had to leave the car there and walk home whilst one was ferried out from the next town. Shoulda reminded them to check before cutting the blown Klarius one off.

Clive

Member
Joined:
Posts: 213

My quad tail pipe is a Double S stainless steel cat back system (with centre box). It came with all necessary clamps, nuts, bolts and rubber hangers. Fitted in 2009 it has since undergone two warranty repairs courtesy of the lifetime guarantee so well outperforms anything Klarius can come up with!

Member
avatar
Joined:
Posts: 7822

I couldn't find a system that included a stainless centre box other than the very expensive ones, so that is an Allmakes mild steel job. That comes with M8 bolts welded to the clamps but no nuts or washers. On my previous one I'd ground the weld off to remove those and used stainless M10 bolts, nuts and washers so I didn't have to get the angle grinder out to remove the old one (as I've always had to do in the past with the M8 mild steel bolts they come with). I'd already ordered the centre box (£60) before I found the stainless system and decided to go with that too, so I've spent £350 in total. My rubbers were all good so them not being supplied wasn't a problem so all I had to find was some washers and M8 nuts. (of which I have plenty).

Member
Joined:
Posts: 213

Looking back at the invoice I think the total package was put together by Rimmer Bros using the Double S system at its core as the lifetime guarantee is actually with Rimmer Bros. I have to say that Rimmer Bros have stood up to their guarantee with no quibbles whatsoever. The first warranty claim the centre box section was deemed repairable - it was collected, transported to Double S for repair and couriered back to me within 48 hrs. The second time the centre section (again) was not deemed repairable (by photos) so Rimmer Bros delivered a brand new centre section to me within 24 hrs. Can’t fault the service.

Member
Joined:
Posts: 781

I have got a Double S stainless system on my diesel. It has been on for 10 years+ now.
All bought secondhand on Ebay. I bought a rear section first then later on a stainless middle box. It is one thing I would buy secondhand. It worst, as long as there are no loose baffles. it can be welded up and repaired. Diesel pipes also point down at the back. I have got twin exhausts.
A couple of comments about Double S :- My pipes are 409 and the boxes are 304 so there is surface rust on the pipes. The clamps and flanges which are quite substantial are just mild steel. My particulate filter from the manifold is just factory mild steel.

Member
Joined:
Posts: 654

When it comes to clamps I'm a fan of the Mikalor type. In stainless steel naturally.

For exhausts and solid pipes they seem to generate similar grip pressures to the U bolt "benelli" type without distorting the pipe so things come apart if need be (providing you have remembered to coppaslip the pipe overlap area).

On hoses they seem to generate a closer to full circle hold than the worm drive jubilee type with modest tightening torque. Easier to keep a socket spanner on too and they don't seize up in the driver or strip the worm pattern off the band like aged jubilee clips are prone to do. Many of the modern affordable jubilee style seem to lack quality and are best considered one time use. If I'm only gonna use it once might as well go for an Ottiker stepless or double ear crimp type as I have the tools. Undoing either can be a pain tho' so I'd rather not. The stainless Mikalor may be 3 or 4 times the price of a jubilee off Mr Halfords shelf but the saving in frustration a year or three later is worth the extra cost to me.

Clive

Member
Joined:
Posts: 654

Finally got my oil filler tube screwed back into the rocker box after the darn thing unscrewed and refused to screw back in on Friday when I topped up the oil .

Had to make a special tool for the job to engage in the two lugs at the bottom to get it in.

Usually simple hand turn'n tighten job when its happened before but this time it decided to go in a bit under a turn before jamming. Even under hand tightening pressure it needed a strap wrench to release it. Not good. At £70 a pop I wasn't going to risk breaking the tube by forcing plastic inevitably embrittled by years and heat.

After scraping the thread in the rocker box made made no difference I measured the thread on the tube so I could make a chaser. Thread is 1.640" diameter, 11 tpi with a 60° thread angle. 1 - 1/4 BSP except for the wrong angle. Actually got as far as setting up to make a 60° chaser before realising that a 60° male thread going into a 55° female would usefully tighten the grip on the plastic. So I modded a brass plumbing fitting to make a chaser and screwed that in. Didn't go as free as I'd like so clearly something in the thread. In and out a few times got it clear with some crud collected by the chaser. Felt right for a 55° thread in the box matching the chaser.

Tube still wouldn't co-operate so I set to and made the tool.

If anyone else has to make one the included angle on the lugs is 32°, slots need to be more than 9 mm wide at the outside end, mine are 12 mm, and tool OD no more than 33 mm so it drops down the hole. Other details to taste. I made my slots the full 10 mm depth of the lugs and relieved the centre. My body is 40 mm long, plenty to keep it stable in the tube, with a 65 mm long 12 mm Ø shaft to reach up the tube having a 13 mm hex (Screwfix M8 joining nut) on the top end for a spanner.

When fitting the tube needed what felt like maybe 4 or 5 ft/lb torque to pass the tight spot then screwed in stiffly but freely with maybe 2 and bit ft/lb force. More than easily done by hand for sure. Frankly it was right on the top end of the torque I felt safe when it jumped the tight spot.

If it comes out again I can see a spiffy custom billet alloy replacement happening.

Clive
Member
Joined:
Posts: 632

I’m not sure if it’s the same issue, but on my D2 (Bosch engine), my oil filler cap was quite seized on the tube so that thaw tube would come out of the engine far easier than the cap from the tube. I removed the assembly and used valve lapping compound to make the cap turn easily on the tube. This would be a bad idea to do on the engine side (unless you had the rocker cover off so you could clean all traces of the compound).

Member
avatar
Joined:
Posts: 7822

Mine unscrewed from the rocker cover two or three years ago but on the GEMS it isn't as tall and is on the other side (LH rocker cover). Initially I cleaned up the end of the thread so I could get it started in the rocker cover without cross threading and found that a pair of pliers would fit against the two internal lugs so I could screw it down tight. Next time I took the oil filler cap off the whole thing unscrewed again. This time I degreased the threads on both parts with a squirt of brake cleaner, put Loctite 2700 on the thread and screwed it down again. It hasn't moved since.....

Member
Joined:
Posts: 654

I guess the root cause is umpteen heating and cooling cycles over the years cause the plastic to distort slightly altering the grip of the threads.

Looks like the threads contract a touch so the cap gets relatively tighter and the tube looser hence the not unknown tube comes out instead of the cap coming off scenario. Certainly my cap feels a bit odd when screwing on, rather akin the the tri-lobular and similar out of round distorted thread locking systems. Especially as it comes up to the end. Genuine caps can currently be gotten on E-Bay for £7 ish so maybe worth a punt to see if mine actually has changed so a new one would screw on more easily.

Impressed that Harv was able to lap his with grinding paste. Lapping and grinding plastic surfaces risks the hard abrasive being embedded in the plastic creating surface something like sandpaper. Which is probably not ideal. Back in the day the optical shop at RARDE was experimenting with finish grinding plastic lenses with less than stellar results. Muggins did the testing! They didn't look good and performed worse.

Not brave enough to consider sticking a pair of pliers down the tube to turn the lugs. Although obviously the shorter tube on a GEMS makes it easier to keep under control. The prospect of having to pull the engine and strip it to recover a piece of errant plastic if a lug breaks being less than enticing. Still need to fork out £70 for a new one. OK it should end up safely in the rocker box but ....

Clive

Member
Joined:
Posts: 2426

MOT! 7k since the last one (can I hear Richard laughing? :) ) and just some niggling advisories apart from some bulbs that they fixed at the garage. 5 bulbs, only two I knew about! hey ho.
Do they still do emmission tests?

Member
avatar
Joined:
Posts: 7822

They should have given you the printout from the emissions test as well as the certificate. If it was running on LPG when you took it in, it will have been tested on that and the printout will show fuel type and only readings for CO and HC. If they tested it on petrol it will show CO, HC and Lambda. Mine went in at the end of August and the only thing he could find was one number plate light bulb out (one that the dash doesn't tell you about if it is blown. I've done more miles in the 6 weeks since the test than you've done all year.....

Member
Joined:
Posts: 591

7k between MOT’s! That’s a lot of use 😂

Our VSE did 1800 last year. We’ve got an L322 that was bought new in 2012 that’s only covered 26k too!

Member
Joined:
Posts: 337

I feel vaguely inadequate..! I haven't done very much to my car of late, though I do eventually want to write up the things I have been up to in my own thread. I'll likely get round to that now that the nights are drawing in.

But I'm just using the car as/when I can. I've had a couple of good runs these last few days - up to one of the ferry ports in the NW highlands. Only me in the car, so I had a bit of "performance leeway". I enjoyed what might be called a 'spirited' drive - overtaking when safe and appropriate opportunities presented themselves. These are roads I know very well, and we're not into the frost yet, so it is just fun to get the old girl up to speed and keep her there. Planting the foot and letting the engine do its work on an overtake brings a smile to my face. Park her up for a couple of days, back off the ferry; fire her up and repeat on the way home!

It reminded me that the Range Rovers have always had a place in my heart since I saw my first ever, walking home from school about 1978/79, a two door classic in a lime/heritage type green. Only on my 4th now... but still enjoying it.

All that said, it's a heavy lump to be throwing about a twisty A road, and I'm not sure my Britpart shockers are doing me any favours... I'll dig around in the archives here and see what's what.

Member
Joined:
Posts: 632

I agree, the P38 is a joy to drive.

Member
Joined:
Posts: 198

Replaced my ABS Ecu to cure speedo woes

Only to have more questions than answers